Showing posts with label Birthday Cards. Show all posts
Wednesday, September 7, 2011
Weaving the blue and brown hearts
8:18 PM
HANDMADE
HB093
Another birthday card design for a guy. I almost cracked my head trying to figure out a new design for this one and at the end of the day, at the very last minute......I used my usual concept with a different layout and it worked! Phew! I'm so happy that my customer approved it otherwise I don't know what I would do considering the deadline is today hahaha.....there is no way I can come up with a new design and get it done by today. So it's a great relieve when she said she loved it! :D
My customer also requested a pop up inside and she gave me full freedom to design it anyway I like and I decided to do the weaving technique for the pop up and weaved some heart shapes to it. I also decorated the background with lots and lots of hearts in different sizes and colours. Level of difficulty ---> 7/10 haha!
Friday, August 19, 2011
Happy 33rd Birthday
6:16 PM
HANDMADE
HB092
I've been having issues with my computer for a while now but I didn't want that to effect my work and alhamdulillah so far everything is under control. I managed to get all my orders done on time. This is the last handmade card order for this month and soon I'll be able to concentrate on other projects at hand. Yes! Yes! Yes! Can't wait to start on the other projects hehehe. :)
I'm not really good at making cards for the guys.....as you all know by now, most of my designs are very girlish hehehe. So it's always a bit difficult for me when I have to design a card that needs to look manly. My customer did request that the card should be in colours like black, red and gold colours so I combined all those three colours for this birthday card. I used my metallic gold card stock which I love so much and add in the other two colours to it.
I decided to use ribbons and beads to decorate the card with. I love using this technique to mix and match a few types of ribbons together. And adding those beads to it too really does adds a special touch. The black polka dots were glued on the metallic gold card stock one by one. I marked the places where the dots should be and glued those paper polka dots on it. Frankly I love doing that.....just love looking at it when it all comes together.
My customer wanted me to use a similar pop up from the HB059 card design for this birthday card and so I did, but I changed the color combination to match the colours of the card and I also changed the wordings on the big pop up heart. I've also done another similar pop up pattern at this V022 card...you can click on the links at the card codes to view the cards :). So this is the 3rd time I've done this type of pop up and I realised how patient I need to be to glue all those tiny hearts on the pop up heart one by one. It took me hours to get it done. I've forgotten what feels like to do it since I haven't made this type of pop up in a very long time. All in all, I'm pretty happy with the design and hopefully my customer feels the same way too! ;)
Thursday, July 14, 2011
For a best friend ;)
11:24 PM
HANDMADE
HB091
I'm so happy.....I finally finished designing this tri shutter card! My customer wanted me to design a tri shutter card for her best friend in a combination of red, black, pink and white. It's her best friend's birthday :). So I decided to focus more on the pink....using pink as the main color for the card as the birthday girl is so sweet and somehow I think that pink suits her best :).
As always when it comes to making tri shutter cards, I'm always having a hard time figuring out how to decorate it. As you can see, there's so many spaces to decorate. The more I study about tri shutters, the more I think I'm thinking too much about the design hehehe. Because I do see other designers decorating them in a simple yet beautiful layout. So I'm trying my best to be simple here but, oh well, I'll leave it to you to judge if it's simple or not hehe.
I made the patterned paper myself. Decorating a blank paper with polka dots and also stamping it with a floral rubber stamp design. I had fun stamping and decorating it with seed beads and tiny red flower sequins....somehow it makes me feel like a textile designer all of a sudden haha!
I really hope the birthday girl loves her birthday card! ;)
p.s. I had to cover up the faces of the people in the photo for privacy purposes. It's a request from my dear customer. ;)
Friday, June 10, 2011
FC Barcelona theme birthday card
12:49 AM
HANDMADE
HB090
First time for me to get an order to make a FC Barcelona theme birthday card. This order is from the same customer who ordered the teddy bear bookmarks recently. He loved the HB088 design I made and wanted me to do something similar to that but with the FC Barcelona theme of course :). And so I did! :)
The design for the front of the card is always tricky to do. Especially the quilled swirls. It can never turn out the same each time I make them. The first time I did it, it was a bit wavy and now it's just a simple bend. But I did put a lot of red seed beads this time around at the quilled swirls. Love doing that :).
I really wanted to do a Bookman Oldstyle Font for the alphabets like the one I did for HB088 but this time around there is one extra alphabet in the name and therefore the space is a little limited to do that on the card in that style where I drew the outline of the font with gold glitters. So, I decided to just arrange the quilled shapes first and later line some gold glitters exactly at the side of each quilled alphabets. This method is much easier for me to do. And I really like it this way. I'm so glad that my customer didn't mind me doing it like that too. Yay! :)
I also did the pop up cake like the one in HB088 except that I changed the logo and of course changed the colors of the heart shapes a bit to blue. As long as it has that FC Barcelona colors in it, it's all good :).
Thursday, June 2, 2011
MU theme birthday card
12:26 AM
HANDMADE
HB089
Recently I received another MU theme birthday card request from a customer who liked my HB072 card that I did last year with a Chelsea FC theme. The colors were more to their team color....it had dark blue, red and black plus the white too. You can view the HB072 card at the link HERE.
So all I had to do was just change the colors to the MU team color like red, yellow, black and white. I tried my best to make the pop up guy inside look like the one I did before but it didn't come out the way I want ed it.....it never does actually hehehe. I'm just not good at making cartoons.....it looks kinda sad in this one compared to the one I did last year which looked more cheerful with his face expression. huhu...
I like the stripes on the card...... :) all because I was able to use my metallic, glittering gold paper hehehe....love how it shines when it hits the light. :)
Monday, May 30, 2011
MU theme pop up cake and alphabets
6:00 PM
HANDMADE
HB088
This is another one of my attempts at making quilled alphabets :). Yes, a customer of mine requested me to make a birthday card with quilled alphabets of her friend's name on the card. She insist that the alphabets be in Bookman Old Style fonts. The colors of the alphabets has to be the same colors like the V032 quilled heart card I made before. And the pop up inside, has to be like the pop up Manchester United cake I made in my HB087 felt hearts card.
I did have problems figuring out how to do the quilled alphabets at first.....because I didn't know how to make it exactly the way she wanted it to be. So in the end I had to come up with my own way of doing it....something I'm comfortable with. And this is how it turned out :). I'm pretty happy with it and so is my customer. Thank God she likes it a lot hehe! Phew! :D
The part I love the most about this card is the small red seed beads that I glued along side the quilled swirls...I had fun adding them on the card :). From a far it looks like teeny tiny quilled circles but actually they are just seed beads :).
Saturday, May 14, 2011
Felt hearts
2:26 AM
HANDMADE
HB087
I received a request to design a birthday card using felt as part of the design on the card. I did freaked out a bit when it comes to using felt because I am not an expert when it comes to using felt as embellishments on cards. I've only tried my hand at using them early this year and still have a lot to learn about it. So I did feel a little scared using them especially since it is a little expensive and therefore I can't afford to make mistakes when cutting them up otherwise it would just be a waste.
When my customer told me how she wanted the design to look like on the card, I was worried as well. Arranging 15 circles and 15 red felt hearts on the card and making sure they are arranged neatly on the card is not as easy as I thought it would be. It had to be precised.....I needed to make the correct measurements. I had a hard time figuring out how to cut the felt into heart shapes too and making sure they are the exact same size. I don't have a special machine to cut felt in the same size and so I decided to make a template for it instead. That solved the problem and I managed to get them all in the same size. Yippee! :D I also used the circle template to get those circles for the heart. If I had a circle cutter, then cutting up circles would be a breeze! :)
Another problem was how to write "HAPPY B'DAY ~SYG~" on the hearts. At first my customer wanted me to stick letters sponge stickers on it....unfortunately they were a bit too big for the hearts. So at the very last minute, I got the idea to use glitter glue instead. Yup, they worked perfectly on felt. I never knew that before! I knew that you can use glitter glue on smooth type of fabric but didn't know that it's great on felt as well. Now I know! I experimented some silver glitter glue on a small piece of felt and after 10-15 minutes, they dried so nicely on it! So I finally could write those letters on the hearts as per request. Phew! Another problem solved!
Then I made a small pop up cake inside the card as per request and decided to put the MU logo on the cake itself as she wanted me to add some MU elements inside the card since her BF is a MU fan :). Simple....really simple :) I'm so glad she loved it so much! :) and I love it too! ;)
Sunday, May 8, 2011
Red roses
9:54 PM
HANDMADE
HB086
I haven't been doing a lot of cards with quilled roses for quite sometime now. So it's nice to be able to get an order to do it recently. I've forgotten how tricky it is to make these. Sometimes it comes out nice and sometimes it doesn't. So I had to make a lot of it and choose the best ones for the card :).
What I love about this card is that for the first time ever, I'm using a gold colored card. Recently I found a really nice gold metallic paper stock and it really caught my eye....I just had to buy it! I've seen some gold paper stock before but I like this one the best...and it's really great for making cards with.
There isn't any pop up designs for this card....so I simply decorated inside the card with tiny red hearts around it. A simple touch. I also drew with a black pen swirling lines at the side of the card.....loved playing with that hehehe.....just simple swirling lines for the roses. I should practice more with the drawing....no matter how nervous I always get when doing it. Afraid of spoiling the card in the process....hehe...well, at least I tried ;).
Wednesday, April 27, 2011
Love themed birthday card
12:56 AM
HANDMADE
HB085
I got this order yesterday afternoon and I had to get it done and posted today. Wow...it's been a while since I took short notice orders from customers. Usually I wouldn't have done this. But since he gave me the freedom to do whatever I wanted, I excepted. Provided that the design must be a new one from me.....and it must not be something that is already available in my blog......so it had to be a fresh design from me.
Honestly I didn't have a clue of how I was going to get it done. It's a birthday card with a love theme. He wanted it to be sweet and have lots of heart shapes in it. Of course, he also wanted a pop up inside it with the same theme.
After seriously brainstorming the ideas in my head, I finally decided to use my new heart shape craft punch set that I bought recently to do designs for the pop ups. I just love how it looks. This is the first time I've ever used a heart shape craft punch for my designs.......well, I mean a bigger size heart shape craft punch that is. Before this I would usually cut the heart shapes myself by hand. But I love using the craft punch now....coz it's so sharp and easy to use. Love playing with it. :) I was so happy that I managed to get the pop up done last night in such a short time. All thanks to the craft punches :)
I thought I was going to get inspired to do the design of the card itself in the morning but no great ideas came to my head until about 10.00am that I finally got something even though it's a simple idea but still, a simple idea is better than no idea at all hahahaha! :D So I proceeded with the idea and this is how it looks like in the end :). I've already posted the card even though my customer has not seen it yet! LOL! He was too busy with work to check his email. He trusted me and gave me the permission to post it straight to his girlfriend.....awwww....he is so sweet! :) His girlfriend is a lucky gal! :)
Have a look at this photo above. He asked me to print this wording out in very small font and paste it at the back of the card below my logo. Isn't it sweet???? :) He must love her very very much. :)
Tuesday, February 22, 2011
A pink blue quilled bird
4:00 PM
HANDMADE
HB084
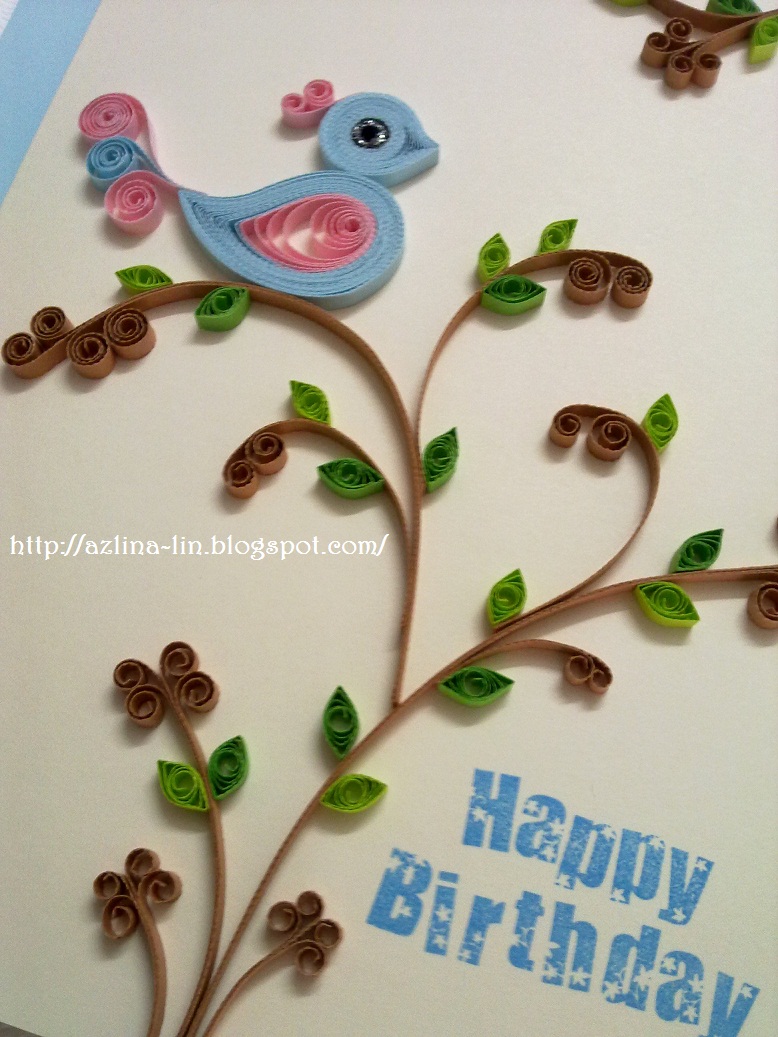
I'm so excited about this design. It's a request from my aunt actually. This birthday card is for her dear friend and ex boss hehehe! :) She wanted a birthday card with a bird on it. I am really out of ideas and I just did a simple design with the usual technique I've done before. Only this time around I made more branches and leaves but just one bird sitting on it. And the bird has an eye! A black eye with silver glitters on it...hahah...kinda funny looking though. By right it doesn't seem to make any sense how a bird can actually stay on the branch like that and not fall off of it! LOL! But in the art world....anything can happen hehe!
I also made a pop up cake inside it......a very soft color combination that would suit the colors of the card itself. Sweet pastel colors. :) I didn't print any wordings for the card but I did use a clear stamp to stamp the Happy Birthday wordings on the card. Love that one. That clear stamp is a gift from a dear friend. Thanks again CC for that clear stamp. I'll bet you've forgotten which clear stamp you have given me hehehe. So many of them actually are still not in use. No ideas coming out for them yet. Soon there will be I hope hehe!
Sunday, February 13, 2011
Black felt electric guitar
12:50 AM
HANDMADE
HB083
:) Finally I get to blog again here today hehehe with the help of my aunt's laptop again but but but......I'm not quite satisfied with the photos I'm sharing here with you today. Due to the problem with my PC, I am not able to upload photos I took of this new design using my digital camera...instead I had to use photos I took with my hand phone instead for this post today. The colors are not that clear and the sharpness of the photo is not up to my satisfaction either but no worries because I have kept the nice photos of this design elsewhere so that when my PC is fixed I will upload them here to replace the ones shown here today hehehe!
I've made an electric guitar before but I made it using foam materials.....you can view the card I made before at the link HERE.......but this time around my customer insist that I use felt materials. I've never in my life used felt before in any of my card designs. I've never bought any before either. Luckily there are a few people who are selling them online and I managed to get in touch with one who had the colors I was looking for. Felt materials are quite expensive but I got a good bargain hehe :). So for the first time ever, I played with felt. Quite interesting really....didn't even know how to draw the pattern on it etc etc.....lucky me coz I got some tutorials from the seller herself and I successfully managed to cut out the pattern of the electric guitar. Phew! What an experience! hehe!
Another issue was how to make the pop up inside the card. I had a hard time deciding a pattern for that one. Finally I came up with this pop up music notes that popped at the top and bottom of the birthday wish. I wish I could have done more with it but didn't have any other ideas hehehe....plus my customer insist on those colors only and must only have music notes as part of the design. Nothing else. So that's all I was allowed to add in it. I'm so glad that my customer is happy with my design! hehe! I love it too and didn't want to part with it actually huhu. Perhaps one day I'll make another one with my favorite color hehe!
Thursday, February 3, 2011
Printed shirts
7:56 AM
HANDMADE
HB082
I received an order from a customer to make a birthday card for a teacher. And she requested the card to be made with combination from a couple of my previous designs. For the front design, she wanted a design that is similar to the design I made at the link HERE where I made some origami shirts.
For the inside of the card she wanted the pop up cake from the card I made in this design HERE , but instead of making 27 candles, I was asked to make only 25 of them since the person receiving this card will be 25 years old soon.
I took so much time making this card. Reason.......because the pattern paper I needed was out of stock. So I had to find a replacement for it that matches the blue color of the card. Luckily I found this particular pattern paper and it's the only one I have! No more available....huhu. I made the shirts dark red in color instead of dark blue and it's also because I ran out of the dark blue paper. So again I had to improvise. As long as the colors matches the pattern paper. Everything on the card and inside it has to match the pattern paper.
One thing I'm loving right now is that I printed or shall I say I stamped on the shirts, a pattern that matched the swirling dots pattern on the pattern paper. I didn't stamped the whole area....just at the bottom of the shirt to give it character. I also did the same for the envelope so that it would match the card. In the previous card design there was a lot of heart shapes but she didn't want any in this one so I had to find other patterns to replace the hearts and the stamping was the one that saved the day. :)