This is default featured slide 1 title

Go to Blogger edit html and find these sentences.Now replace these sentences with your own descriptions..

This is default featured slide 2 title

Go to Blogger edit html and find these sentences.Now replace these sentences with your own descriptions..

This is default featured slide 3 title

Go to Blogger edit html and find these sentences.Now replace these sentences with your own descriptions..

This is default featured slide 4 title

Go to Blogger edit html and find these sentences.Now replace these sentences with your own descriptions..

This is default featured slide 5 title

Go to Blogger edit html and find these sentences.Now replace these sentences with your own descriptions..

Search This Blog

Showing posts with label Quilling. Show all posts

Tuesday, August 9, 2011

Quilled cupcake & chocolate bookmarks

BM014 - (with pink cupcake)


BM014 - (with peach cupcake)
 
I've done quilled cupcakes before but never done any quilled chocolates and I love it hehehe! I just did 3 very simple different shapes of it in dark brown quilling strips. They look like dark chocolates! Yummy! :)

These bookmarks were a request from a customer of mine who makes and sells chocolates and cupcakes too. I get hungry just browsing her blog! hehe!

Wednesday, July 13, 2011

Best Fishes

BW002

Best fishes! Or shall I say Best Wishes! hehehe! I've seen a lot of people making cards with this wordings on it and I just couldn't help but make my own version of it. :) I even saw a clear stamp during my visit to a craft store recently that has those wordings with a couple of fishes too. It was so cute but I couldn't afford to buy it at the time hehe. So I thought why not make a couple of quilled fish instead. Never made one before. So I gave it a try. This is how it turned out! :)

I was thinking of stamping the words on the paper but each time I stamped the letters, I kept making mistakes and it looked so ugly. So out of frustration, I decided to write the wordings myself! hehe! 

What I love about the card is that this is the first time I'm experimenting with a new technique that my fellow quiller Asma' has taught me. She did an online tutorial at her blog about her Royal Flower. I haven't the chance to try and do the Royal Flower yet but I did try the technique of curling the loops like how she did with her Royal Flower. And it was fun! I love the effect it gives. :) I also tried to curl the coils in the body of the fish. Look closely and you can see what I was trying to do :).

The card is not completely done yet....haven't done the envelope and was thinking of making a pop up inside it too. Still in the thinking mode but had to share the design here first hehe. Couldn't help myself, LOL! :D.


Tuesday, July 5, 2011

Slotted paper quilling tool


Interested in a slotted paper quilling tool? Well, I have good news for everyone out there who are fans of quilling! I'm  now selling this quilling tool! :) It's about 12cm in length, with a brass needle slot and a plastic blue marble like pattern handle.

Honestly, I really love this quilling tool.!! It's definitely my favourite quilling tool now amongst my collection of quilling tools. It's so comfortable to use because of the long plastic handle and I really love the slotted part that is quite long in length compared to the one I bought when I first started to learn how to quill. It just makes quilling big coils of quilling paper a lot easier, in my personal opinion. The tight gap of the slot makes it easy for the quilling paper to stick and coil around it. No slips at all. Love it! :)

So if you are interested to get this lovely quilling tool, do email me for details on how to purchase them at my email address: inaabdul_21@yahoo.com


Friday, June 24, 2011

Tool box 3


I've just finished making another batch of quilled items for my 3rd tool box yesterday. I think this will be the last tool box I'll be making because I need to concentrate on other projects in the next few months. Making these quilled items for the tool box is very very time consuming as you all know. And if I were to make another one, it will probably be for me hehe! Coz I would like one for myself as well haha! :D

It's a big relief to be able to get this tool box done and I am really in need of a holiday. I will be taking one soon next week and I'm just counting the days now. Been working non stop for two months straight and it's nice to take a long break for a while. Want to go hunt for new supplies as well. Visit new craft stores and feast my eyes with beautiful things hehe! Do fun stuff with friends too! :D
So I will be away till 4th of July and will resume back to work on the 5th. Have a good weekend everyone! ;)

Friday, June 10, 2011

FC Barcelona theme birthday card

HB090

First time for me to get an order to make a FC Barcelona theme birthday card. This order is from the same customer who ordered the teddy bear bookmarks recently. He loved the HB088 design I made and wanted me to do something similar to that but with the FC Barcelona theme of course :). And so I did! :)

The design for the front of the card is always tricky to do. Especially the quilled swirls. It can never turn out the same each time I make them. The first time I did it, it was a bit wavy and now it's just a simple bend. But I did put a lot of red seed beads this time around at the quilled swirls. Love doing that :).

I really wanted to do a Bookman Oldstyle Font for the alphabets like the one I did for HB088 but this time around there is one extra alphabet in the name and therefore the space is a little limited  to do that on the card in that style where I drew the outline of the font with gold glitters. So, I decided to just arrange the quilled shapes first and later line some gold glitters exactly at the side of each quilled alphabets. This method is much easier for me to do. And I really like it this way. I'm so glad that my customer didn't mind me doing it like that too. Yay! :)

I also did the pop up cake like the one in HB088 except that I changed the logo and  of course changed the  colors of the heart shapes a bit to blue. As long as it has that FC Barcelona colors in it, it's all good :).                                                                


Saturday, June 4, 2011

Thinking of you...

TOY001

Remember the paper I designed the other day? Well, I got carried away and designed some more after that and I used them for my second tri-shutter card! hehe! ;) This is what I call, making use of what you have and make the best of it. Coz sometimes that's what you gotta do when you don't have everything you want. You just make use of what's available and make it work! Just like what Tim Gun used to say on Project Runaway haha. :D.

Sorry the photos did not turn out as well as I wanted it......the true color of the card is the one at the bottom where you can see how the dark pink color turns out exactly the same like the real card. The photos at the top seems a little off with the colors probably because of the color of the table that reflected it's wood color onto the paper. I donno, I'm not a professional photographer and still have lots to learn about lighting effects etc.....but if you wanna know the true color of the paper, you look at the photo at the bottom ya.....that's the one that looks exactly the same.

I also added a little quilling here and there on the card and some heart shape paper I punched out with my heart shape craft punches. I hope to design more patterned paper for myself to use for my handmade cards. It's fun to play with the stamps. At least this way I'll get to use them more often.....they've been kept safe in the box for too long.....they need to go out and play! hehe! :D


Monday, May 30, 2011

MU theme pop up cake and alphabets

HB088

This is another one of my attempts at making quilled alphabets :). Yes, a customer of mine requested me to make a birthday card with quilled alphabets of her friend's name on the card. She insist that the alphabets be in Bookman Old Style fonts. The colors of the alphabets has to be the same colors like the V032 quilled heart card I made before. And the pop up inside, has to be like the pop up Manchester United cake I made in my HB087 felt hearts card.
 
I did have problems figuring out how to do the quilled alphabets at first.....because I didn't know how to make it exactly the way she wanted it to be. So in the end I had to come up with my own way of doing it....something I'm comfortable with. And this is how it turned out :). I'm pretty happy with it and so is my customer. Thank God she likes it a lot hehe! Phew! :D

The part I love the most about this card is the small red seed beads that I glued along side the quilled swirls...I had fun adding them on the card :). From a far it looks like teeny tiny quilled circles but actually they are just seed beads :).


Wednesday, May 25, 2011

Quilling alphabets

V052

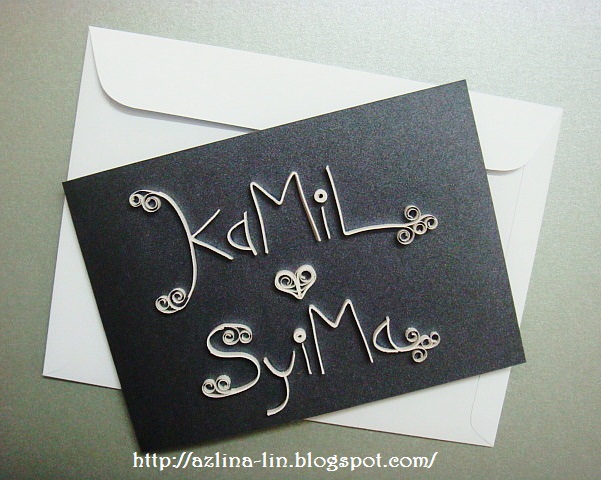
First time ever I got a request to quill alphabets on a card.....and in this case it's a love theme card. My customer was interested in the love birds card with the pop up inside but he wanted me to quill white alphabets instead of having those love birds on the card. And so that's what I did. 

It was pretty tough because I've never done it before.....and didn't know how to go about it. He requested that I spell their names with combination of big and small alphabets "KaMiL <3 SyiMa". Now that it's done, I wish I had done it on a bigger sized card....I feel like this card is a bit small for those alphabets....oh well.....it's already done and I can't turn back....lesson learned.

I hope that I will have more chance to practice quilling alphabets in future on my handmade cards. I feel like it's even more difficult than quilling those love birds :P....seriously! haha! Now I really respect those who can quill alphabets so well. :)

Sunday, May 8, 2011

Red roses

HB086

I haven't been doing a lot of cards with quilled roses for quite sometime now. So it's nice to be able to get an order to do it recently. I've forgotten how tricky it is to make these. Sometimes it comes out nice and sometimes it doesn't. So I had to make a lot of it and choose the best ones for the card :).

What I love about this card is that for the first time ever, I'm using a gold colored card. Recently I found a really nice gold metallic paper stock and it really caught my eye....I just had to buy it! I've seen some gold paper stock before but I like this one the best...and it's really great for making cards with.

There isn't any pop up designs for this card....so I simply decorated inside the card with tiny red hearts around it. A simple touch. I also drew with a black pen swirling lines at the side of the card.....loved playing with that hehehe.....just simple swirling lines for the roses. I should practice more with the drawing....no matter how nervous I always get when doing it. Afraid of spoiling the card in the process....hehe...well, at least I tried ;).


Friday, April 29, 2011

Big red heart

V051

Another combination from 2 different cards I've made sometime ago. The design of the card is from V046. The original is actually all dark red in color including the heart. But my customer wanted the card to be in black instead. So I did as per request. 

The pop up inside is from the card V014. I tried to do it exactly as the original as I can.  I did that design way back in 2009. I haven't done this design again in a long time :). So it took me a while to figure it out how to do it again...hehehe....but luckily I managed to remember how it's done.

I even made changes with the envelope......I used to make the envelopes for this size of card a little differently. But now I've made some alterations to it to make it more suitable for the card. I like how the big red heart looks on the black card. Love the contrast. :)

Wednesday, April 27, 2011

Love themed birthday card


HB085

I got this order yesterday afternoon and I had to get it done and posted today. Wow...it's been a while since I took short notice orders from customers. Usually I wouldn't have done this. But since he gave me the freedom to do whatever I wanted, I excepted. Provided that the design must be a new one from me.....and it must not be something that is already available in my blog......so it had to be a fresh design from me. 

Honestly I didn't have a clue of how I was going to get it done. It's a birthday card with a love theme. He wanted it to be sweet and have lots of heart shapes in it. Of course, he also wanted a pop up inside it with the same theme.

After seriously brainstorming the ideas in my head, I finally decided to use my new heart shape craft punch set that I bought recently to do designs for the pop ups. I just love how it looks. This is the first time I've ever used a heart shape craft punch for my designs.......well, I mean a bigger size heart shape craft punch that is. Before this I would usually cut the heart shapes myself by hand. But I love using the craft punch now....coz it's so sharp and easy to use. Love playing with it. :) I was so happy that I managed to get the pop up done last night in such a short time. All thanks to the craft punches :)

I thought I was going to get inspired to do the design of the card itself in the morning but no great ideas came to my head until about 10.00am that I finally got something even though it's a simple idea but still, a simple idea is better than no idea at all hahahaha! :D So I proceeded with the idea and this is how it looks like in the end :). I've already posted the card even though my customer has not seen it yet! LOL!  He was too busy with work to check his email. He trusted me and gave me the permission to post it straight to his girlfriend.....awwww....he is so sweet! :) His girlfriend is a lucky gal! :)


Have a look at this photo above. He asked me to print this wording out in very small font and paste it at the back of the card below my logo. Isn't it sweet???? :) He must love her very very much. :)


Monday, April 25, 2011

Love birds and weaving hearts

 V050


:) what can I say....the love birds are a favourite right now and here is another request from a customer who wanted this design to be combined with one of my pop up design I did long ago. She wanted the card to be bigger and the pop up to be like the one I made for Mother's day. You can view the design at the link HERE.

As you can see....the difference in the pop up is the colors. I had to change the colors to match the color of the card. So there is a lot of red colors used for this design. Different shades of red. :)

The card looks so empty on the outside....a  lot of space. I was thinking of doing the design again for her but still thinking of how to go about it. I thought of making the birds bigger in size but, looks like it's not possible even though the card is bigger because it just doesn't seem right if I did. It won't be able to fit in anyways....unless it's arranged horizontally instead. 

Well...I'll just have to keep on trying...experimenting with this design.....hopefully I'll find a new idea to make it look complete :).


Saturday, April 23, 2011

Pink and blue love birds


V049

Gosh....I don't know how many times I've been making these love birds this month. Quite a lot actually hehe! The white ones....the red ones and now....the pink and blue ones :). This is actually a request from my customer who adored the wedding love birds card. She loved the design so much but she wanted the birds to be in soft pink and soft blue instead.....plus, she wanted me to add those quilled hearts at the top, just like the ones I did for the cupcakes card a while back. My customers do have their own ideas and love to combine some of my designs together.....like designs from card A combined with designs from card B for instance hehe. But I loved the idea otherwise I wouldn't have agreed to do it :).

It's a very simple design......no pop up inside at all.....just a paper inserted inside for my customer to write in her own wishes. I've actually done pink and blue love birds before but the pink and blue paper I used were a bit darker than this one. I think I prefer this soft colors compared to the darker ones I've used before. This is sweeter hehe. :)