Showing posts with label house. Show all posts
Wednesday, April 20, 2011
Little Miss Lily Pad's Fifth birthday....
6:02 PM
HANDMADE
Sunday was my first daughter Maddie's fifth birthday party, and it was chaos -but fantastic fun. In typical Lily Pad style, between the two of us we 'designed' a party made from a lot of homemade, handmade items - and had an absolute ball preparing together.
The theme was 'Under the Sea' - an idea which we stretched our imaginations a bit for, in order to make her original idea of a Barbie Mermaid party suit all our friends, boys included. Maddie hates to leave out her two best boy buddies, Tyler and Campbell, so she suggested the wider theme. We asked them if they'd like to come as pirates (they looked fantastic) - and lead the 'treasure hunt'. To make the treasure hunt, we hid gladwrap sandwich bags of small balls, packs of playing cards, gold chocolate coins, notebooks and pencils in the clam shell pit, then Maddie drew a map with "X marks the spot", and hubby traipsed the two pirates, Maddie, and all the other littlies on a wild goose chase all around the property and back to the clam shells. There they 'dug for treasure' with teaspoons til all the prizes were found.
The second game was 'pin the tail on the mermaid', which Maddie and I drew together earlier in the week, and she painted. Our decorating theme included giving each child a pair of paper 'googles' to wear under the sea (a ceiling full of blue balloons and green seaweed), a table of food sitting on top of a striped picnic rug, instead of a table cloth, bunting flags (another great excuse to use the free alphabet bunting downloads I love on ruffled) and an activity getting the kids to decorate gingerbread mermaid and starfish cookies with coloured icing and sprinkles.
Once all the welcome games and activities were over, the kids had a picnic on a blue beach towel, with 'takeaway popcorn' in boxes, 'fish 'n' chips' wrapped in takeaway packages of newspaper and wax paper, and 'goldfish bowl' blue jelly with fish lollies inside.
Instead of a loot bag, each child took home their googles, a balloon, and their own gingerbread cookies.
I have to admit I went all out for this party and made a mermaid outfit for Maddie, as well as a 'guppie' outfit (skirt and tail) for my little one year old. They looked so cute!
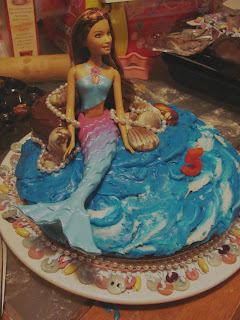
I also spent a lot of time thinking about her cake, which I made the night before, and kept a big secret. She was quite overwhelmed/excited/blown away and unfortunately cried when it was time to blow out the candles! Oops - too much for one small child!
It's quite wierd now, with the big party over, and the waiting game of two weeks of school holidays before she's off to school for her first day. Lots of time to write names on clothing and stationary, but also a big build up! I hope it goes well.
Love you HEAPs Maddie Moo, and I'm so proud of you
xxx
Sunday, January 30, 2011
The launch of "I {heart} re-designing"
1:35 PM
HANDMADE

As well as creating new projects from scratch, or buying glorious fabric to hide away and then deciding what to do with it later, a lot of my creative time is spent “re-designing”.
This realisation only hit me on holiday this year, when I started making a ‘to do’ list of my upcoming creative projects for the year. Most of them revolved re-creating something to give it a new lease on life. Generally it’s something old, that could be useful when used a different way; or could be prettier if it was recovered or repainted; or it could be a project partly made from something I saw and bought just the other day, and had to ‘improve’.
Sometimes my re-designing is because our little family is run on a tight budget. Sometimes it’s because we are forever renovating and fixing our old house. And sometimes it’s simply a time-passing away/busy fingers moment or a way to de-stress after my day job. But mostly, it’s because I love something, can’t possibly throw it away, and need to re-use it to justify keeping it. (That's when it counts as not hoarding, right?)
So I started talking to my wonderful partner in this blog, Greta, and we decided that between us, we have a million projects already finished and sitting around, under construction or on the 'to do list' this year that fit this bill. Some of them include:
• Reusing cool old boxes and Formula tins as kids toy tidies, covered in fabric;
• Rescuing abandoned rattan furniture in the inorganic collections, rethreading the twine in the broken seats, and repainting them (I’ve done this twice!)
• Reusing the old kitchen bench as a new computer desk in the study
• Recovering the old dining table chairs with a funky black vinyl, totally changing their look
• Rescuing old wooden furniture off family and friends, sanding and repainting it to give it a new life
• Reusing favourite clothing pieces or tea towels to make new cushion covers
• Cutting up an old Trelise Cooper top I can't throw away (but will never fit again) to make a sun hat for my baby
• Changing an old 80s pattern into a modern ‘sloppy joe’ sexy t-shirt
• Rescuing abandoned rattan furniture in the inorganic collections, rethreading the twine in the broken seats, and repainting them (I’ve done this twice!)
• Reusing the old kitchen bench as a new computer desk in the study
• Recovering the old dining table chairs with a funky black vinyl, totally changing their look
• Rescuing old wooden furniture off family and friends, sanding and repainting it to give it a new life
• Reusing favourite clothing pieces or tea towels to make new cushion covers
• Cutting up an old Trelise Cooper top I can't throw away (but will never fit again) to make a sun hat for my baby
• Changing an old 80s pattern into a modern ‘sloppy joe’ sexy t-shirt
* Fabric painting designs on clothing or shoes
• Repurposing a little girls Butterick pinafore dress pattern into a strappy sundress and piecing together some favourite fabric offcuts to create a modern look.
So one sunny afternoon on holiday I decided that while they don’t always involve fabric, my projects always involve craft, colour, family and love, and they should count as writing fodder for this blog. And Greta agrees. Some of the above list (which we will come back to and hyperlink as we go) could even be ‘tutorials’.
We’ve designed a little button that will identify these “re-design” projects so they’re easy to spot (see left). We’d love it if you could use it too on your blog posts about your re-design projects, and link back to ours, leave a comment below, and share the ideas around. We'd love to create a master list of great re-design ideas (we've even made a special tab at the top of our blog to keep them handy). Some of our favourites by others we'd love to be there include:
• Cotton Kiwi's Sock Monkeys and Vintage Tea Cup pincushions (I have made two monkeys, with two more half finished for presents)
• A Little Vintage’s custom made dolls that use heirloom fabrics and baby clothes (I have four so far made in my special fabrics)
• Songbird Designs' fabric covered hair bobbles (I own TONNES of these)
• Amy’s Button Necklaces.
• Moon Mum’s vintage wallpaper and buttons birdie art (I used these in my baby's room)
• A Little Vintage’s custom made dolls that use heirloom fabrics and baby clothes (I have four so far made in my special fabrics)
• Songbird Designs' fabric covered hair bobbles (I own TONNES of these)
• Amy’s Button Necklaces.
• Moon Mum’s vintage wallpaper and buttons birdie art (I used these in my baby's room)
* Turning your husband's shirt into a little girl's dress on Made by Dana (I promise to do this in Feb, this month coming! I have chosen the shirt)
• Turning a kid's t shirt into a dress on Make It or Love It
• Made by Rae’s ‘altering’ of patterns from McCalls.
My first offical “I love re-designing” post will be “The One Hour Sloppy Sexy Joe” t shirt. Watch this space!
Sunday, January 23, 2011
Anzac-ifying my house...typography style
2:25 AM
HANDMADE


For around six months I’ve had an idea in my head for a new painting in my house and finally, I’ve done it. This time I tried something completely new in terms of technique, and inspired by my partner in OTLP, Greta @ Topography.
An art history student way back when, I particularly love modern art and some of my favourite pieces are ones by Toulouse-Lautrec and New Zealander Colin McCahon which use hand drawn or stencilled words. I don’t necesarily like political messages, but more the forms of words and the use of them as creative expressions of the brush themselves. As a journalist by trade, I have a thing for words.
So therefore it's pretty logical that I adore the new fashion trend of using Typography in interior design fabrics, nursery fabrics, and on canvas art works, particularly in black and white.
An art history student way back when, I particularly love modern art and some of my favourite pieces are ones by Toulouse-Lautrec and New Zealander Colin McCahon which use hand drawn or stencilled words. I don’t necesarily like political messages, but more the forms of words and the use of them as creative expressions of the brush themselves. As a journalist by trade, I have a thing for words.
So therefore it's pretty logical that I adore the new fashion trend of using Typography in interior design fabrics, nursery fabrics, and on canvas art works, particularly in black and white.
I wanted to do something totally unqiue to our family though, so armed with a piece of graph paper, I came up with a combination of words and numerals important to my New Zealand childhood and my husband’s Australian childhood. Using the graph paper squares, I spaced them according to the different widths needed for different sized fonts and then hit the craft shops looking for stencils to fit. I also bought some scrapbooking letters, to use as a stamp when wiped generously with oil paint.

Miss Four and I painted the canvas black, and then used white oil paint through the stencils and on the back of the scrapbooking letters, as stamps. I actually love how it came out partly looking hand-drawn and partly like place name signs. Alongside my extra large size canvas I did a few years ago featuring flax and toi toi, and my new fantail cushion, and my treasured Aboriginal bird painting, I feel like I’ve ‘Anzac-ified’ my house appropriately.
Wednesday, December 8, 2010
My creative space: princesses and castles
12:47 PM
HANDMADE

My creative space has been so crazy busy with my new Summer 2011 lily pad range (I will post some photos here later on today or tomorrow, but they are up on facebook now!).

So busy infact, that on the weekend my Miss Four and I decided to have a 'creative break' from being creative and redecorate her room. Now that's she's nearly ready for school, her tastes have changed a little and she's incredibly interested in fairy tales and understanding all the old stories like Sleeping Beauty, Rapunzel and the Princess and the Pea.
I recently finished a 'Fairy Tales' range of pinboards for one of my retailers, and she was really taken with the fabrics I used from Heather Ross' 'Far, far away II' collection - of the owl and the pussycat, and Rapunzel. We decided to make her a GIGANTIC pinboard using the pink Rapunzel fabric as the main feature. It's incredibly heavy, being made of a big piece of 1200mm MDF, so Daddy needs to work out a way to hang it yet!

Complementing the 'Princess in a Tower' theme, we've hung a gorgeous white netting canopy over her bed, and decorated the top railing of it with triangle-shaped bunting (like tower flags). I used the same idea as I did for her sister, with some free alphabetical downloads made to print.
Her dollhouse actually looks like a castle already (clever Daddy!).
The final touches will be some new bedding, I'm thinking of using this delicious pink pom pom fringing pictured above all over one side of a throw cushion, for some texture, and some lovely fabric with princess crowns on it for another cushion. Any other ideas?
For more creative spaces coming to life, visit everyone else playing our weekly bloggy game at Kirsty's.
Monday, November 8, 2010
Where to find - Alphabet Posters!
1:01 PM
HANDMADE
You can tell from my label Topography that I am obsessed with letters and the alphabet, so my current mission for an alphabet poster will come as no surprise!
We recently moved house so I have lots of blank walls to figure out including two children's rooms and a lounge that needs some colour... I think alphabets as clever as these ones would also work in a 'grown-ups' space.
![]() | ![]() |
![]() | ![]() |
These are my favourites at the moment (clockwise from top left):
- Vintage Alphabet art print, Sweet William at Felt
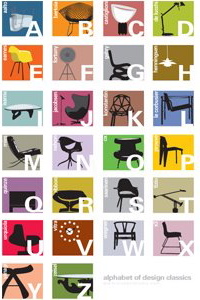
- Alphabet of Design Classics, Blue Ant Studios at Design Online
- Alphabot, Bold & Noble at Unique Boutique
- Owlphabet Poster, Gingiber at Etsy
If you have any other suggestions please let me know!
Wednesday, November 3, 2010
My Creative Space - is my new creative space!
2:38 PM
HANDMADE
My 'Creative Space' blog game contribution this week isn't my latest crafty project, as per usual.
Instead, I wanted to share with you my new creative space - literally! I am super excited that now instead of having my sewing business equipment spread out over the floor, kitchen table and one half of the computer nook, I now have a dedicated workspace.
For months now I have trawled trademe looking for a hideaway computer 'armoire' - like a vintage styled freestanding wardrobe with doors where you can hide everything away. But I really wanted one that has a platform inside for a computer (aka my sewing machine and overlocker) that would slide and extend out, so my knees can go underneath. Finally I found one. This one is even better than I hoped for, because the doors slide into 'cavities' in the side, so you don't feel closed in, or lose the light.
I've sorted all my ribbons, threads, patterns, staple guns, brads, scrapbooking, everything I own that's to do with lily pad designs, and filed them in boxes. I've sorted my fabrics into baskets into the cupboards. And I've moved out of the dark computer nook and into the best light in the whole house - the corner of the living area leading out onto the deck. Now the girls can play around me while I sew. Bliss!!!!
Of course, my trusty pinboard had to come with me - as you know I'm obsessed by them. Attached to the back side, now there's no way little fingers can steal my contacts' businesscards, my magazine cut outs, etc! If your browser makes the top picture big enough, you can probably even spy my new 'mood board' hanging behind my machine...it's got my latest thoughts on my new Summer 2011 range, launching in a couple of weeks...
Next step - I want some cool handles - I'd quite like some big decorative Asian style handles - like the filigree circles you see on their ancient cabinets: can you help, does anyone know where to buy those?
To be inspired by a huge range of other crafty projects coming to life each Thursday, made by crafty people in NZ and Australia, visit the My Creative Space blog game at Kirsty's.
Tuesday, November 2, 2010
Lori-lou's first birthday: fairground fun
12:46 PM
HANDMADE
The bunting I'd made earlier set the scene, and I reused the image on her party invitations too.
We used an ice-cream machine to whip up 'soft serve' ice creams, which we served in little striped punnets, like in the olden days, with lashings of toppings like chocolate sauce, M and Ms, and fruit sticks like Mr Whippy uses. I downloaded some PDFs to make vintage pop corn boxes (as seen on Lil Magoolie a couple of months ago - I saved the idea) and we made club sandwiches too.
The cake was just a simple chocolate cake, but I dressed it up with fruit kebabs cut into flower shapes with cookie cutters to look like a flower bed. My four year old and I did it together the day before, so it was a stress free morning. She'd actually been the one to 'find' the idea of fruit kebabs from her preschooler's magazine, Sparkleworld. I just developed it into a cake idea....as well as the flower bed, we mixed coconut into the icing to make it look really 'grassy', like a field.
It was a lovely, laid back party without a stress in the world to organise. Lori-lou looked divine in a special rose covered party dress bought in Australia by her Nanny and smiled her whole way through it. I hope you enjoy seeing the photos as much as I enjoyed organising it :)
Wednesday, October 27, 2010
My Creative Space....bunting, bunting
2:59 PM
HANDMADE
I discovered this gorgeous free downloadable ‘alphabet’ bunting and made a string of bunting with “Loren-is-one” out of scrapbooking paper. It prints with a pattern on the front, so I used the print of the scrapbooking on the back so it's fully reversible. I simply sewed the scrapbooking paper onto a ribbon – whola! I wrote about it for Baby Bites magazine here. I love it so much I’ve now transferred it to her bedroom wall.
Working with the paper to make the celebratory-themed bunting has led me down the road of two new ideas now.
But once I’ve finished that, I’m going to go and buy a whole bunch of red and green scrapbooking paper, and some high quality Christmas wrapping paper, to make some 'mini tree bunting' to sell at my upcoming markets – the Summer Fair at the Michael Park School, Ellerslie next weekend Nov 6, and the Devonport Craft Market, Nov 21.
Fun, fun! Hop over to Kirsty’s for more creative projects coming to life....
Wednesday, September 1, 2010
My creative space: it's not about fabric!
2:58 PM
HANDMADE

Following all the links to the wonderful crafty people in last week's 'My Creative Space' bloggy game, I came across Megan from Mousehouse's awesome blog. Megan is a wonderful sharer of great ideas and has some neat tutorials on there. I couldn't wait to get started and spent most of the weekend on some non-fabric related crafts. It's been about 3 months since I last picked up my photos, scrapbooking stuff and paint brush because I've been so busy with the launch of lily pad d's...so thanks heaps Megan for the inspiration!

I had my heart set on the Personalised Children's Art Idea - where you overlay a photo of your child with text that acts like a time capsule and records things about them at their current age. I had a head-start because I was recently given electronic copies of my two girls' professional photos, taken when we stood in and pretended to be models for my friend's small New Zealand merino clothes business, billi tees. But I had a few technical difficulties, because unfortunately I don't have Photoshop or Pages or a specific photo/graphics programme.
Instead what I ended up doing was importing my photos into simple old Powerpoint. I've had heaps of success making home-made Christmas cards and party invites in Powerpoint, because you can position pictures and words wherever you want and move and layer things freely. You can either print straight to your printer, or save a slide as a 'jpg' and email it around. Powerpoint can't do flash things like 'white out' areas though, so instead of 'whiting out' my girls clothes like Megan does, I just positioned the text on the plain background, printed and then cut the photos to size to fit my frame. I still think it looks cool.
After that, I wanted to try to copy the idea of photo blocks, which I've seen recently on a friend's wall. These are made of images glued onto wooden MDF blocks, and are hugely expensive to be done commercially. My take on it was to buy a double set of little square canvases (from the Warehouse, for $2 for the set). I painted the sides of the canvases black, then printed the photos from a slide in Powerpoint. I'd positioned the photos how I wanted them and to the right size. Now I'm up to the stage of varnishing the photos and canvases, to give it a 'pro' look. I'd love some advice actually. Shall I use my paintbrush, or maybe a small roller?

Happy cs space everyone!