This is default featured slide 1 title

Go to Blogger edit html and find these sentences.Now replace these sentences with your own descriptions..

This is default featured slide 2 title

Go to Blogger edit html and find these sentences.Now replace these sentences with your own descriptions..

This is default featured slide 3 title

Go to Blogger edit html and find these sentences.Now replace these sentences with your own descriptions..

This is default featured slide 4 title

Go to Blogger edit html and find these sentences.Now replace these sentences with your own descriptions..

This is default featured slide 5 title

Go to Blogger edit html and find these sentences.Now replace these sentences with your own descriptions..

Search This Blog

Showing posts with label DIY. Show all posts

Friday, September 2, 2011

Things I'm loving...Dads.


This week I'm loving...hanging out with Dads, on Father's Day.


Miss Five has decided that this year we are going to make a little rugby team of gingerbread men for her Dad's Father's Day present. We've bought coloured icing to make them Australian green and gold icing tops...and of course we'll also mix some with a bit of red and blue to make some black shirt opposing All Blacks too!


She is SO excited about the Rugby World Cup 2011 - how neat is that!


But I'd also love to set up this activity for her and her Dad to do together. It's a fun, free and easy DIY that will keep the kids entertained for hours and keep Dad busy with the craft knife and string: amazingly cool little cardboard guitars, which I discovered online shared on one of my absolute favourite blogs. They have been created by the very clever Dad in the Make It Love It blog family.


To make them, all you need are old cardboard boxes, glue, pencils, jumbo rubber bands, and an adult to wield a craft knife. Simply follow the step by step instructions in the link above, thread the rubber bands as strings, and pretty soon you’ll be teaching the kids the classic song “Dance to my 10 guitars”.


We have heaps of cardboard boxes left over from moving house.

And I also thought, why not combine with my girls' favourite love - painting – and get out the craft paints and decorate them too?

(PS: if you need a reminder of the 10 Guitar song words, find them online here. I love this song too!)


To see what everyone else is loving this week, hop over to Paisley Jade's.


And Em's asked me also to link to the I'm Grateful bloggy game...so hop here to see who else is grateful for and loving Dads this Father's Day weekend!


To read my original column on babybites, click here.


Tuesday, July 26, 2011

Silhouette Portraits


I was so inspired by a wall art project on mousehouse the other day that I couldn't wait to do something similar but personalised. After a week of mulling it over, a bird on fabric became... my kids on paper! I did it a bit different to other tutorials I have seen so here's my steps in case you want to do one too (and there's lots of other project ideas at Our Creative Spaces).


First you need some profile photos... I found bathtime was easiest for this! Because I was doing two, I wanted them similar sizes, so I just opened both pics in a Word document and played with the sizes until they were similar and fitted on an A4 page (if you are a Photoshop ninja you could of course go straight to drawing an outline but I did it old school).


I like working with stencils, so you can try again when you stuff up use them again - I keep food boxes to use for this as they are nice light cardboard, just paste your printed photos (from your A4 Word document) on to the cardboard and when the paste is dry carefully cut out the heads (I changed some details with ballpoint pen first, like giving them necks!)

Then decide which way you want them facing, I wanted the finished pictures to look to the right, so I used the stencils pointing to the left (the photo-pasted side is facing down). Trace around on black paper (I got some nice matte black paper from an art shop for 35c) in ballpoint, add a soft point below each neck, then cut out carefully with small sharp scissors.


Once you have cut out the shapes, turn them over and you can play around with colour, yay! I was going to use scrapbooking paper but found this pack of mixed A4 paper on sale (wrapping paper or wallpaper would be good too). I had planned to use bright colours but Miss 4 insisted on the gold.

Then you just need to attach the black piece of paper - paste might make wrinkles so doublesided tape or a glue-snail is easiest.


Because I did two pictures on an A4 to start with, each one now fits nicely on to an A4 backing, and A4 frames can be cheaper to buy than other sizes (sometimes they are called certificate or display frames). 

Other wall art posts we have done...

Saturday, April 30, 2011

Easy Treat: Eton Mess

Dessert on Friday night was a tribute to Eton old boys William and Harry.


1. Meringues 
They don't need to be pretty, so the kids can help. I was out of cornflour so just used 3 egg whites beaten stiff, then 3/4 cup of caster sugar added gradually + a splash of vanilla essence (12 palm-sized meringues cooked 1 hour @ 120 degrees C, then cooled in oven). Or just buy some!


2. Fruit
Strawberries are traditional, but any fruit or sauce will do. I had some frozen mixed berries so cooked them up with a tablespoon of sugar, strained them a bit to get a thick lumpy sauce, and left to cool. Tinned boysenberries would be good too - one day I will try rhubarb ( a la Sophie Dahl)


3. Whipped Cream


4. Mess!
Cover a whole meringue with cream, broken meringues and sauce. The messier the better (this pic is a bit tidy really, but didn't stay that way...)

p.s. added bonus of being gluten-free for those who need it   :)

Wednesday, March 23, 2011

My Creative Space - Abstract on Turquoise


My very neutral lounge needed some colour.


The only colour it had was this board Aimee made me last year and this A Little Vintage cushion I love. So I was inspired to use turquoise, white, black and red.

This square canvas had been intended as a nursery project for my son, abandoned when I found something better than I could ever draw! It is nice and big, 61cm x 61cm.


I chose a testpot for the base colour (Resene Endorphin) - I love testpots because you can get amazing colours and the paint is so nice to paint with, runny but with great coverage. There was enough for two coats (and two brushes, thank you Miss 4), which easily blocked out the really dark paint underneath.


After the base was dry, we did a white layer (just in art acrylic paint), which I left to dry so that it wouldn't turn pink and grey with the next colours. My 'vision' was a messy corner/L-shape, with which my helper concurred.


I had a black testpot already and an amazing new red (Resene Rocket).  Miss chose to use the black brush, so I did the red and we finished it off. It looks even better than I was hoping for, bright and fresh, and reminds me of Japanese writing characters. After a varnish layer only one question remains, which way up?

Every Thursday 'My Creative Space' is at www.kootoyoo.com

Wednesday, March 2, 2011

My Creative Space: Far, far away in dreamland...


After six months of delays when I went back to work full time, Miss Four and I finally finished her bedroom makeover recently. With school looming, she has moved on to being interested in proper old fairy tales like Rapunzel and Sleeping Beauty, rather than simple toddler stories.

I originally started to blog about the beginning of this project here then never completed it. But as I noted then, it was inspired by fabric designer Heather Ross' "Far, Far Away" fabric collections... no's I and II. I adore her whimsical drawing style, like book illustrations -and the quality of the fabric is so gorgeous and tactile. Miss four loves Rapunzel in particular, so that is the main print.
She also loves tiny princess dolls and castles, so her Dad built her a dolls house shaped like a castle, and for Christmas we got her a second hand miniature castle and painted it, and popped it on a blue and green table that she proudly calls 'the lake around the castle' (the moat).
I've also since found an old original "Grimm's Fairytales" hardback book in a wonderful rummage sale (along with some mint original Dr Suess hardbacks) and am thinking about starting the concept of reading a 'chapter' each night.
Nearly five! I can't believe it.

Monday, February 21, 2011

I {heart} re-designing - Felt Tip Couture Shoes

We love customising and re-designing, but it never occurred to me that shoes could be customised too! You can draw straight on to canvas shoes with the right pens and it is SO much fun.


This tutorial on The Craft Revival used kids shoes, but I thought I would try some adult ones... inspired by this Wonder Woman* patch, I drew some bold shapes (first in pencil, then black) and then just coloured in like a colouring book - fun! I love how the blue has come out looking like denim.


Of course the pens are going to go further on small shoes... I left the sides plain white so I wasn't just using up ink (I think I will do some stars on the back panel).


The pens are Faber-Castell Pitt Artist Pens and I found them in an art shop - the colours are in packs and work out to be about $5 each, but you could buy a single black one and try monochrome too (the key is that they are waterproof once dry). I'm not sure how far they will go - I am going to try some for Miss 4 next.
*Like Strawberry Shortcake dolls, the Wonder Woman TV series is one of my most vivid childhood memories - and it is about to be re-made...

Wednesday, February 16, 2011

My Creative Space - Pooh Messenger Bag

I love messenger bags and have found another awesome tutorial - my first bag project was this easy tote. This time it was a surprise for Miss 4, who has been using shopping bags to imitate my shoulder-bag ever since I went back to my part-time job a few months ago ("Bye mum, I'm off to work").


She is obsessed with Winnie the Pooh (unavoidable really as I am too and have been brainwashing her since birth), so I have combined denim offcuts with some Pooh accents. If you do not recognise the applique on the flap, it is from the TV series 'My Friends Tigger and Pooh', which has little in common with the original stories but involves 'super-sleuthing' mysteries. It was a very easy applique, just a question-mark shape I already had from my t-shirts, plus a triangle with rounded corners.


The lining fabric was leftover from a pinboard Aimee made my daughter as a baby shower present (see - since birth!) and Spotlight had the Pooh and Tigger twill tape in a clearance a few weeks ago. I followed the tutorial pretty closely and just made the strap approximately 2/3 the original length so it was child-sized.


It was so much fun that I am trying to figure out what I would like on one for myself - applique? some patchwork? The beauty of the messenger bag is you can embellish the flap however you want. Thanks mmmcrafts for a great tutorial.

Around 200 creative spaces are on show every week at http://www.kootoyoo.com/.

p.s. If you are not a sewer but would like to get a messenger-style bag for a little person you know, these gorgeous ones are currently on sale...

p.p.s. I love these bags by the very clever Cat Taylor

Thursday, February 10, 2011

Baby Bites Column: Handmade Love Notes in a Bottle for Valentines Day


Handmade love notes and yummy treats for Valentine’s are the best way to say I love you to your partner. They’re even better when they’ve been made by your kids! Check out these two fabulous ideas you can make with your children at home this week, without having to spend a fortune.

I simply adore Mini Eco’s “love note in a bottle” made with invisible ink and paper cut out hearts. The invisible ink is made with lemon juice – how clever is that! You could pick up the love hearts or some little craft gems from the craft stand in your local stationary store. You could also substitute the paper hearts with confetti, beach shells, or flowers from your garden, or how about making one of those garlands of paper dolls to put inside, to symbolise your family holding hands?

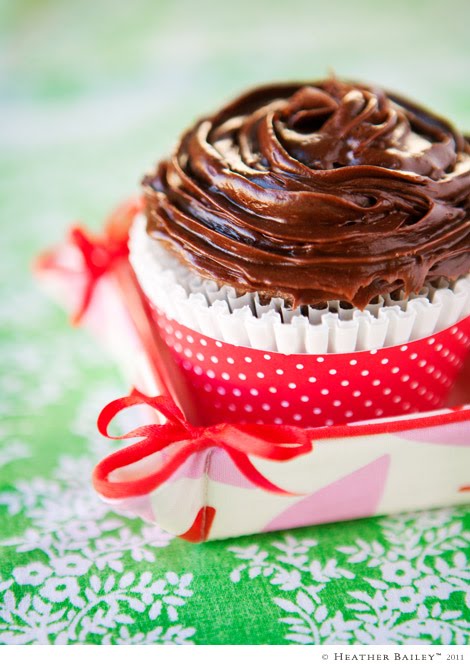
I also love these little cupcake wrappers, called, ‘treat and trinket trays’ made out of fabric scraps and ribbons. A downloadable free pattern from US fabric designer Heather Bailey, the pattern also comes with a chocolate cupcake recipe. Easy!
Read my original column on Baby Bites online magazine here, and while you are there, enter Baby Bites' 2nd Birthday Prize Draw! It's amazing, loaded with goodies and includes a giveaway prize of a lily pad.

Friday, February 4, 2011

I {heart} re-designing: The 1 hour Sloppy Joe t-shirt


Since I had my second daughter just over a year ago, I’ve been loving the current fashion of baggy, sloppy tops with either bat-wing arms or drop shoulders that slide sideways off your shoulder sexily. Some look like casual, 80s inspired ‘sloppy joe’ types; some look like nautical ‘Bretton’ shirts; and some are lovely, breezy 'going out' tops made in chiffon. They are super kind to post-baby tummies, sit nicely on your hips, and show off one of a women’s best assets: the décolletage.

I was determined to find a way to make these shirts, to beef up my summer wardrobe. I knew I wanted some 80s-inspired ‘sloppy joe’ types, in particular in nautical stripes; and a grey one, like a Fame-inspired look; and a long tunic/dress version in a nice black silky fabric that I could wear with a belt to work.

After much retail research, trooping around Max, Cotton On and Witchery, looking at how they are constructed, I figured it out. The secret to the style is ensuring that the front and sleeves are only made from one piece, so there's no sleeve seams, resulting in the draped, drop shoulder look.


With this in mind, I hit my Mum’s stash of patterns. What I wanted to do was re-design a simple pattern. I was after was a straight-line, square-ish type of top that I knew I could alter.

Using one of her 1980s 'easy' Butterick pattern and an even older Kwik Sew pattern to compare, I placed the pattern on the fabric, then added a couple of inches width at the fold, to make it really baggy (I measured my favourite baggy gym shirt, to give me the right width I needed). I also knew that I had to extend the neckline from a round neck to a sexier, wider ‘slit’ style. To make it look even funkier, I added 'turn ups' on the sleeves too.


Easy! I’ve made two stripy tees so far, and I absolutely love how they came out. I also lengthened them to the same length as my long tunic style tops, and they sit perfectly on my hips. The best part: they only take an hour start to finish!

Want to do something similar? Here’s my advice:


• Buy a really lightweight cotton knit from Spotlight, the cheaper and lighter the better.


• Find an old pattern in your Mum’s stash or download one of the free ones online (here's a goodie from Fitz Patterns, and it's free) that has a drop shoulder or an all-in-one body and sleeve. It doesn’t matter if it has a different back (mine had a v-dip in the back) or has a zip or is too short – we’ll be ignoring those features, and potentially widening it at the sides, too.
The free KATE batwing pattern from Fitz Patterns.


• Alternatively, find one of your own baggy gym shirts or one of your dressy ones in the same style as we’re trying to recreate; or your favourite t-shirt of your partners that you always steal!
Use this to decide the shape and width of your pattern.

• Fold your fabric in half, wrong sides together. If you are using a pattern, lay the front piece on the fold (see picture, so in effect you are cutting two 'halves' at the same time, only opposites). If you are using an old t-shirt, fold it in half, lay it on the material on the fold, and fold back the sleeve so it's only a short extension on the side, like 2-3cms, or a cap sleeve length. Trace the whole way around, or pin the shape around.

* If you need to, widen the width of the pattern so it will be baggy enough. So for example, working with half my Butterick pattern on the fold, I personally need to lay the pattern 5cm further away from the fold (giving me an extra 10cms in total in width of the shirt).

• Don’t shape the sides or the hem. Make it a straight line side.

• Keep the 'sleeve' extension of the pattern short, like a cap sleeve - 2-3cms wider than the side seam is all you need.


• Lengthen the pattern so it's more like a tunic length.


• If you can, alter tbe neck so it's wider and more like a 'slit'.


• Cut out. Now flip the fabric and pattern over - trace and cut again - so you have two pieces: an identical front and back (only opposites).


Then sew it all together and whoila! The easiest fashionable shirt in the world!

PS: I didn't learn any fancy tricks to sew with knits. I just used my normal settings, and went at a steady, if slow pace, so it didn't stretch. You don't really need an overlocker either, as t-shirt material won't fray. (Sorry mum! Yes, this is cheating).
PPS: Want to do one for your kids? On Make it and Love it this week (co-incidently) they posted on how to re-purpose two old men's t-shirts into a new baseball style shirt for kids. Check it out, it's an awesome idea!

Wednesday, February 2, 2011

My Creative Space - Easy Ribbon Necklace

A 2 year-old's birthday gave me the excuse to try this awesome tutorial from Prudent Baby, and it is just the kind of small, fiddly project I like.


She doesn't usually wear pink so I went with purple and blue, a pale blush and some craft ribbon with flowers. All you have to do is sew each loop on your machine, then tidy up the join by melting the ends back on to the back of the loop (don't worry, it is explained much better in the tutorial!)


Instead of a ribbon tie at each end, I used one main ribbon and sewed it on to both of the end loops, so the 2 year old could just pull the necklace on and off without worrying about it coming untied.

Let us know if you try this one yourself - it took me about half an hour - and check out this grown-up looking version from Prudent Baby (one of our favourite blogs by the way, they also had the dress tutorial Aimee used here).


The creative space game is back for 2011 at www.kootoyoo.com, check it out!

p.s. you could also use this idea for ribbon (or fabric) scraps left over from other projects, so I will call it a re-design too!

Tuesday, February 1, 2011

Free 'back to school' printables by Creative Mamma


If you love free downloadable printables as much as me, you will be very excited about my latest find. All you need is some children to gift them to and you are totally justified in the ink costs!

Why? Well, it's back to school and kindergarten this week and time to shake off your littlies' holiday mode.

There's never a better time than now to set up your expectations for the year in terms of encouraging good manners, setting up a before and after school or kindy routine, instilling tidy up times or introducing new chore lists. Why not make it fun by giving them a gift of a matching 2011 Kawaii kids Organisation kit?

Free to download at Creative Mamma, this kit gives your child a monthly calendar for the year they can write on; a weekly chores chart; 'reward coupons' to cash in; shopping lists and to do lists they can fill out; and stickers to decorate. All decorated with cute Japanese cartoon "Kawaii" characters.

Now your child can be proud of their responsibility filling out the calendars and charts themselves, and keeping them on display.

And while you're on Creative Mamma's website, you could download some free downloadable Kawaii school book stickers, mini note cards, or free Valentine's cards for your kids to give you to say thanks for all their cool new stationary!
To read my original column on Creative Mamma on Baby Bites, click here.

Sunday, January 23, 2011

Anzac-ifying my house...typography style


For around six months I’ve had an idea in my head for a new painting in my house and finally, I’ve done it. This time I tried something completely new in terms of technique, and inspired by my partner in OTLP, Greta @ Topography.

An art history student way back when, I particularly love modern art and some of my favourite pieces are ones by Toulouse-Lautrec and New Zealander Colin McCahon which use hand drawn or stencilled words. I don’t necesarily like political messages, but more the forms of words and the use of them as creative expressions of the brush themselves. As a journalist by trade, I have a thing for words.

So therefore it's pretty logical that I adore the new fashion trend of using Typography in interior design fabrics, nursery fabrics, and on canvas art works, particularly in black and white.
I wanted to do something totally unqiue to our family though, so armed with a piece of graph paper, I came up with a combination of words and numerals important to my New Zealand childhood and my husband’s Australian childhood. Using the graph paper squares, I spaced them according to the different widths needed for different sized fonts and then hit the craft shops looking for stencils to fit. I also bought some scrapbooking letters, to use as a stamp when wiped generously with oil paint.

Miss Four and I painted the canvas black, and then used white oil paint through the stencils and on the back of the scrapbooking letters, as stamps. I actually love how it came out partly looking hand-drawn and partly like place name signs. Alongside my extra large size canvas I did a few years ago featuring flax and toi toi, and my new fantail cushion, and my treasured Aboriginal bird painting, I feel like I’ve ‘Anzac-ified’ my house appropriately.

What do you think? Might pop it into the Creative Collective's January challenge to try a new craft and share it...

Wednesday, January 19, 2011

DIY: beach-side baby pool


My Dad is always coming up with projects to build or create something using something stored in his garage. This time he’s hit upon an idea that I reckon is tops!
With a crawling baby and a four year old, trips to the surf beaches usually mean stopping them from going in the water too deep, and ending up standing in the white wash, holding on to them for dear life. After a while you just want to sit down on your towel and relax, but the babies have other ideas.
So why not create a safe little pool within arms reach next to your towels where the babies can sit, keep cool, and build sand castles around themselves at the same time? My two could happily spend half an hour in there, and you can sit and watch and relax.

To make your DIY Beach Pool:

Step One: Go through your garage and find a small tarp (or head to the Warehouse and buy a small tarp).
Step Two: Hit the beach, appropriately sun-blocked. Using a spade, dig a shallow small hole next to your beach towel.
Step Three: Lay the tarp in it, use sand to hold down the edges, and use a bucket to add about 4 bucket fulls of sea water, enough for a splash and a play.
Step Four: Sit back and watch your kids play safely! Relax!
Step Five: Shake out your tarp and take it home for next time!