This is default featured slide 1 title

Go to Blogger edit html and find these sentences.Now replace these sentences with your own descriptions..

This is default featured slide 2 title

Go to Blogger edit html and find these sentences.Now replace these sentences with your own descriptions..

This is default featured slide 3 title

Go to Blogger edit html and find these sentences.Now replace these sentences with your own descriptions..

This is default featured slide 4 title

Go to Blogger edit html and find these sentences.Now replace these sentences with your own descriptions..

This is default featured slide 5 title

Go to Blogger edit html and find these sentences.Now replace these sentences with your own descriptions..

Search This Blog

Showing posts with label Valentines Day Cards. Show all posts

Monday, August 8, 2011

I miss u so much

V053
 

In my previous post, I was working on carving those lettering on paper. The lettering turned out well I must say in the end. I'm pretty happy with the results. I was a bit worried in the beginning but now I'm really loving this particular lettering template a lot all because of the font :) I use this technique a lot for my bookmarks but rarely use it for my handmade cards the past few years. I did do this technique quite a lot in 2007 for my handmade cards though and carved out shapes of roses back then. :)

For this design, I was given the freedom to design it any way I wanted it. This card is actually for my customer's hubby. He is a MU fan. So she requested the card to have MU colors on it....that's why you see a lot of red and some yellow in this design. I didn't want to put any MU logos or whatever that has any relations to MU other than the colors. I made sure I put a lot of foam hearts as she loves foam hearts a lot. I sure did gave her a lot of it! hehe! 

I cut all the foam hearts by hand using my ordinary scissors. I just love making them especially in that particular shape. It was fun :). A good practice for me :).

In the beginning I was kinda lost on how to arrange them on the card and finally the idea just came to arrange them that way. There is no pop up, no decorations inside the card other than a paper inserted inside for writing in personal wishes. That was my customer's request......she wanted it simple like that. :) I'm really glad that she loved it :).


Friday, April 29, 2011

Big red heart

V051

Another combination from 2 different cards I've made sometime ago. The design of the card is from V046. The original is actually all dark red in color including the heart. But my customer wanted the card to be in black instead. So I did as per request. 

The pop up inside is from the card V014. I tried to do it exactly as the original as I can.  I did that design way back in 2009. I haven't done this design again in a long time :). So it took me a while to figure it out how to do it again...hehehe....but luckily I managed to remember how it's done.

I even made changes with the envelope......I used to make the envelopes for this size of card a little differently. But now I've made some alterations to it to make it more suitable for the card. I like how the big red heart looks on the black card. Love the contrast. :)

Monday, April 25, 2011

Love birds and weaving hearts

 V050


:) what can I say....the love birds are a favourite right now and here is another request from a customer who wanted this design to be combined with one of my pop up design I did long ago. She wanted the card to be bigger and the pop up to be like the one I made for Mother's day. You can view the design at the link HERE.

As you can see....the difference in the pop up is the colors. I had to change the colors to match the color of the card. So there is a lot of red colors used for this design. Different shades of red. :)

The card looks so empty on the outside....a  lot of space. I was thinking of doing the design again for her but still thinking of how to go about it. I thought of making the birds bigger in size but, looks like it's not possible even though the card is bigger because it just doesn't seem right if I did. It won't be able to fit in anyways....unless it's arranged horizontally instead. 

Well...I'll just have to keep on trying...experimenting with this design.....hopefully I'll find a new idea to make it look complete :).


Saturday, April 23, 2011

Pink and blue love birds


V049

Gosh....I don't know how many times I've been making these love birds this month. Quite a lot actually hehe! The white ones....the red ones and now....the pink and blue ones :). This is actually a request from my customer who adored the wedding love birds card. She loved the design so much but she wanted the birds to be in soft pink and soft blue instead.....plus, she wanted me to add those quilled hearts at the top, just like the ones I did for the cupcakes card a while back. My customers do have their own ideas and love to combine some of my designs together.....like designs from card A combined with designs from card B for instance hehe. But I loved the idea otherwise I wouldn't have agreed to do it :).

It's a very simple design......no pop up inside at all.....just a paper inserted inside for my customer to write in her own wishes. I've actually done pink and blue love birds before but the pink and blue paper I used were a bit darker than this one. I think I prefer this soft colors compared to the darker ones I've used before. This is sweeter hehe. :)


Wednesday, April 20, 2011

Elephant sponge stickers

V048


Elephant sponge stickers! Yes! I got me another cute strip of sponge stickers! I couldn't help myself. It's just too cute for me not to buy it so I got me one for my card making experiments hehe. This one has a fabric like texture on it and it has glitters too. Love it! It's more to elephant theme.....as you can see most of the stickers are of elephants. 

I made one card.....just a simple card that can be made using this stickers. And then I wrote "I love you" to suit those cute elephants hehe. I just love playing with my new toys! :) They are so cute!

Sunday, April 17, 2011

Red hot love birds

 W016

One day I woke up with this idea to have these love birds red  in color on a white blank card . Not just red hot for the birds, but even for the branch, leaves, the tiny flower and the heart. :) I just wanted to see what it looks like on paper.....whether it looks the same as the idea I had in my vision or not. After completing it, I must say that it's the same as the vision I had in my head and I loved it. :) I'm not sure if others would agree as the colors are quite contrasting and the red color really pops from the white background.

I'm just experimenting with colors for this design. Trying to see what other colors would be suitable other than the colors I've done before. I must say that I really enjoy making this  particular design.  Somehow I just love the process of making it and how it looks in the end. Very therapeutic :).


Friday, April 15, 2011

Wishing I could steal your heart too...

V045 - WITH POP UP

As you can see, this card design is not a new one....but what's new about it is that I've added a pop up inside it as per request from my customer. He loved the design of the card but  it didn't have anything inside it and so I suggested to him that I do a pop up that is similar to the design I made for the card V034. Yes, lately, I've been doing a lot of pop ups of that particular design since so many fancy the design a lot :).

Of course I had to match the design of the pop up with the colors available on the card. And so that's how it all started. So now I've got a blue version, black version and a red version of the pop up. :)


He requested that I write the wordings inside the card with my own handwriting. :) I always get nervous when my customers request me to do that, because one tiny mistake will spoil the whole thing and I would have to redo the whole pop up. So I gotta make sure that I have a steady hand whenever I need to write the wordings. Must make sure I had enough to eat otherwise, my hands would be shaking hahaha. ;).


Wednesday, March 30, 2011

Quilled cupcakes

V047

My first attempt at making cupcakes using the quilling technique! Again another simple design from me! hehe! I was trying to make the topping of the cupcake a little more fancy but the only thing fancy about it is the silver glitters! hehe! This card is meant to be given to a guy so I tried to simplify the cupcake as much as possible so that it won't seem so girlish.

I'll bet some of you might find this design familiar ya? Yes.......it's actually a V040 design, with the quilled teddy bears on it. It's exactly the same color.....just like how my customer wanted it.....all I had to do was change it from teddy bears to cupcakes :).

I really love the wordings that my customer made for her BF.....so so nice! Awwwwwwwwww........ ;)

Monday, January 24, 2011

Be mine

 V046b

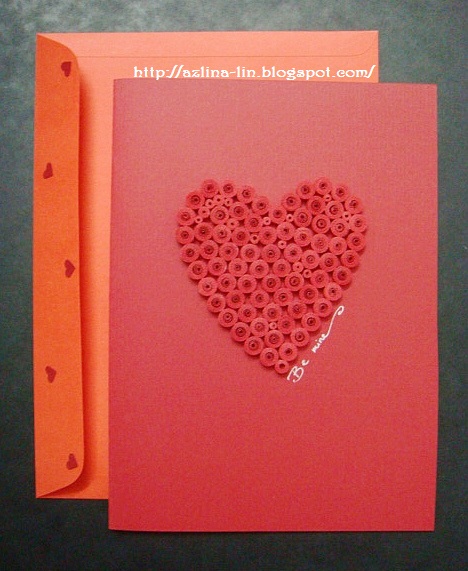
I'm sure a lot of people have seen card designs that are made using just one type of color.....like white or off white. I've seen a lot of those lately and inspired to do the same. But instead of white decorations on a white card.......I decided to do red on red simply for Valentine's day :).

I love the chubby heart so much and wanted to give it a new twist. Usually I would use a smaller card stock whenever I make quilled hearts, but this time I decided to go just a little bigger. Just a little hehe! And I can see that the chubby heart looks right at home with this size of card. It's just nice. :)

If you look closely......most of the tight coils I made are of the same size....except some teeny tiny ones that I made to close the gaps in between the tight coils. I kinda like this method better than the ones I've done before actually hehe. I think in future, this is how I will do it for all my new quilled heart cards.

The card above is the same as the card below except for the wording "Be mine" on it. ;) Just wanted to see the difference between the two. Some prefer the quilled heart without any wordings and some prefer some at the side of it.


V046a


Saturday, January 8, 2011

For the girl who stole my heart #2

V045

I received a request from a customer who wished for a V038 card design with a different color combination. A combination of RED and WHITE. I kinda like the idea of seeing those two colors combined in this design. I had to add soft pink in it to soften the tone a little. The silver color always adds a sparkle in the design. :)

There was no request for pop ups, so I didn't make one. Just some wordings printed inside that was so beautifully written by my customer. How I wished someone would send me something like that hehehee. 


Thursday, January 6, 2011

2 hearts in knot

V044


And she did it again!! Yup! Another simple card design for your view today hehehe! Sorry,  I just couldn't help myself....my brain has not been able to come up with complicated designs lately...hehehehuhuhu. ;P

Again......with this design, I experimented with a new clear stamp that I bought together with the clear stamp that I used to make the Solitaire Heart yesterday. I really love this clear stamp. It reminded me of my childhood days when I learned to play the piano. Everyday I had to read these similar music notes and practice playing the piano at home. It's been years since my fingers last touched the keys on the piano. Yup...I do miss playing it. 

I didn't use any quilling technique for this one. I just added those red foam hearts at the sides of the knotted black ribbon and decorated them with silver glitters and tiny white hearts. And it's done. All done in just a few minutes! ;) Woohooo! Fun!


Solitaire heart

V043

I must say that this is the simplest card I've ever made in my history of card making! LOL! :D Well....close. Perhaps there were other designs I've made in the past that were simpler but I've forgotten already. Don't blame me if I forget these things....it happens sometimes hehehe.....perhaps I need to eat more Omega-3 supplements for better memory! ;)

I've been on my "experimenting mode" lately.  Experimenting with my new clear stamps hehe. I bought some new ones recently and I've been wanting to try them out. And this is just one of the experiments that I'm loving at the moment. As you can see from the photo above, what I did was I stamped on the red card stock using a script writing clear stamp with black ink. I stamped it a few times to get that effect on the whole  front page of the card. In other words, I sort of decorated the empty card stock with the script writing stamp all over it. 

Then, I just lined a black ribbon at the side of the card and glued a medium sized colourful quilled heart at the bottom of it. Simple right? It's a quick and easy way to make a card if you are in a hurry! hehe! :)


Saturday, December 25, 2010

Chubby heart


Which one you love best?? The chubby heart on the left or the slim heart on the right? hehe! I am finding it hard to decide because I kinda love them both right now. Originally, I have been making the quilled heart card using the slim heart template but recently I got a request from a customer to make the heart look a little chubbier. And so I did it!! As per request. ;) She is very happy with it of course hehe....but the whole idea got me thinking...hmmmmm ;)

You see...when I think about it, perhaps the chubby heart should be made on a bigger card to make it look  more balanced? What do you think? Because all this time, I've been making those hearts on that small card with that particular slim heart size and I've always thought that it's the right size of heart for the card. Now, when I look at the chubby heart, I question myself whether I should be making them in that size or should I just stick to the original slim heart size. Decisions decisions! hehe! Should I change the size for good?? Or should I just do both hehehe! After all, art is subjective right? ;)

So..........I would like to know your opinion on this matter........which quilled heart card you love best? The chubby one or the slim one? ;)


Sunday, December 5, 2010

Quilled love birds

 V042

This new design is a continuation of the design of the quilled love birds I made recently. The one I did before had the quilled love birds sitting so close to each other. A good friend of mine wanted something similar  to that design but she wants the birds to sit not too close to each other.

So that's how I came up with the idea to have both the birds sitting on a different branch. One sitting on the right side and the other on the left side. Heheeheeh! I love how the layout looks....especially the part when they look like they are talking to each other (the silver dots symbolizes the conversation between them) and the heart at the top shows that they are talking about how much they LOVE each other hehehehe ;).


Friday, December 3, 2010

Missing you

V041

This is my first ever attempt to make quilled birds. I just made the simplest ever quilled bird!! hahaha! So much so that I didn't even made the eyes or beak for it. It's as simple as simple can be. :D

I showed it to my Mom and she said that the branch I made has defied gravity!! LOL! hahaha! So true! It looks like it's hanging in mid air! :D Well......that's how it is.  Each has it's own interpretation of what they see in the artwork. So I just leave it to your imagination. :)

Actually, this card I made is for the December giveaway. I needed a simple design for it. And this is what I came up with. Still in the love theme concept though. Probably because I love that theme so much hehehe.

I used another one of my clear stamp collection with the wordings "missing you". I think it's cute. Suits the card as the card is quite small. I have to make 12 of this card design in December.... :). Wish me luck!!! hehe!


Thursday, November 25, 2010

Teddy bears in love...

V040

:) I have a big smile on my face as I am blogging about this new quilled teddy bear card because one of the teddy bears is wearing a TIE!!! hahaha!! Funny isn't it?? But I like it anyways :). I just didn't know what else to put on it and suddenly I thought of a tie....a black tie to match it with. Made from black paper which I cut out using plain scissors of course. Just a simple looking tie :).

I made this card for a customer of mine who wants to give it to her future hubby on her wedding day hehehe. Hope she likes it. Otherwise I would have to think of another design for her...hehehe. :))

I filled up the card with the teddy bears and all......so much so that there is no space for the wordings.......then I thought of stamping the wordings inside and added two cute little hearts of red and blue to symbolize the two lovely couple :). 

*Wish I had someone to give this card to.... :P (booohoooohooooo) LOL!